|
|
|
|
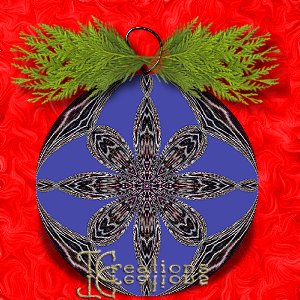
Snowflake Ornament
This tutorial was created November 25, 2001 ©TCreations 2001 This is my own creation. Anything similar is purely coincidental. Please do not copy any part of this tutorial or place it anywhere without express written permission from me. Property of TCreations. This is my first tutorial so I am a little nervous. I realize there are so many ornament tutorials, but this came along by accident and I wanted to see how hard it was to write a tutorial. Okay, let's get started. The tools needed for this tutorial are as follows.
A
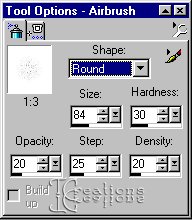
30 day trial version of Paint Shop Pro Filter Factory B you can get here Filter Factory plugins need to be converted to Pico (plugin commander). You can get the information you need at the same site as the plugin. Another very useful place to check out is Renee's Pico Tips located Here. Step 1: Open a new image 300x300 transparent, 16 million colors. Make your foreground color black. Choose your floodfill tool and flood fill your image. Step 2: Change your foreground to white. Choose the airbrush tool and apply the following settings:
Step 3: Airbrush all around the black image as uniform as possible, covering the whole image. It should look like this:
Step 3: Change your foreground to a nice red color. I used #FF0000. Once again choose your airbrush tool and with the same settings as before, cover your entire image as uniform as possible with your red color. Step 4: Change your foreground color to blue #00056E. For the last time, (I promise) choose your airbrush tool and with the same settings as before, apply your blue to your image as uniform as possible. This is what you should have now.
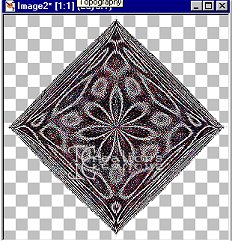
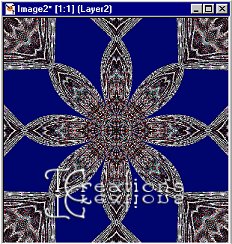
Step 5: Go to effects> filters/plugins and using the filter factory B> Accelerating glass, apply, using the default settings. Step 6: Go to effects> geometric effects, and apply the circle. Go to effects> sharpen> sharpen. Apply the circle 2 more times sharpening your image after applying each new circle. Step 7: Go to Effects> Edge> Enhance and apply. Once again, sharpen your image by going to Effects> Sharpen> sharpen. Here is what you should have now.
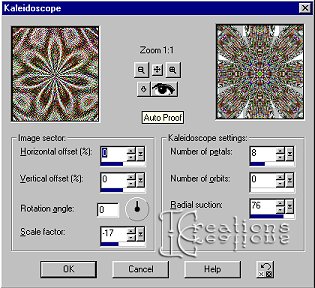
Step 8: Now, go to Effects> Reflection Effects> Kaleidoscope and apply using these settings.
Step 9: Add a new layer by going to layers> new raster layer. Change your foreground to blue #00056E. Click on your flood fill tool and flood fill your image. Step 10: Open your layer pallet and drag the new layer to the bottom. This is what you should have now.
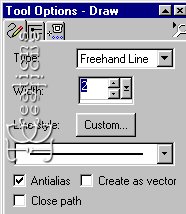
Step 11: Go to layers> merge visible. Now go to Effects> Geometric Effects> Circle. Sharpen your image by going to Effects> Sharpen> Sharpen. Step 12: Now you will want to resize your ball. Go to Image> resize and resize by 75%. Make sure "resize all layers" is UNCHECKED. Effects> sharpen> sharpen one more time. Step 13: With your mover tool, move your ball towards the bottom. This will give you room to make your loop for your hanger. Add a new layer by going to Layer> New Raster Layer. Step 14: Click on your draw tool and apply these settings.
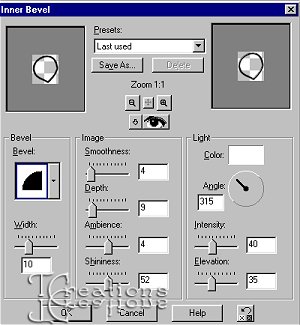
Change your foreground to black with your background set to null. Draw a loop at the top of your ball. Go to selections> select all, then to selections> float. Your loop should be the only thing selected. Go to effects> 3D-effects and apply the inner bevel with the following settings.
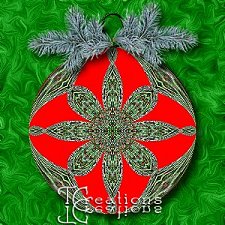
Now deselect by going to selections> select none. Merge your layers visible, and you're done!! Export as a picture tube and place it in your tube folder. I hope you have enjoyed this tutorial. If you have any questions, feel free to E-Mail me. Here is another version using different colors. It's up to you how you want it to look.
©TCreations 2001
|