|
|
|
|
Teardrop Inset Globe
This tutorial was created January 15, 2002 ©TCreations This creation is my own. Anything similar is purely coincidental. Please do not copy this tutorial or place any of it's contents any other place without express written permission from me. Property of TCreations.
This tutorial was written in and for PSP version 7.04 and assumes that you have a working knowledge of the program at an intermediate level.
I have learned so much by doing other tutorial writers tutorials. I learned about the perspective horizontal effect by doing a tutorial by my good friend Patti at Moon's Designs. It inspired me to create the Teardrop Inset Globe. I hope you like it. Let's get started! Tools needed for this tutorial is as follows.
JASC's
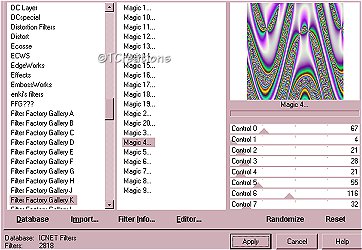
PSP (30 day free trial) you can get here. Super Blade Pro (optional) download a free copy or purchase it HERE. Filter Factory K you can download HERE. Filter Factory plugins need to be converted to Pico (plugin commander). You can get the information you need at the same site as the plugin. Dizz Dividers font you can download HERE. Or a base of choice. Step 1. Open a new image 400x400. Transparent, 16 million colors. Flood fill with white. Step 2. Find you filter factory K plugin and choose the Magic 4. I keep my filters in "Filters Unlimited". Your screen may look different. Apply the default settings. I have found that any of the Magic filters would work great with this globe, play with all of them to see what you like best.
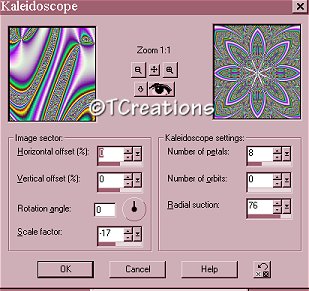
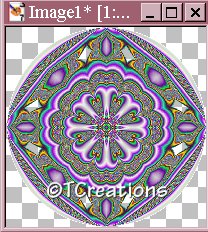
Step 3. Go to effects> geometric effects> circle and apply. Sharpen your image by going to Image> sharpen> sharpen. Step 4. Go to Effects> Reflection effects> kaleidoscope and apply using these settings. Sharpen your image.
Step 5. Go to effects> geometric effects> circle. Sharpen your image.
Step 4. Go to effects> reflection effects> And apply the kaleidoscope again using the same settings as before. Then Sharpen your image.
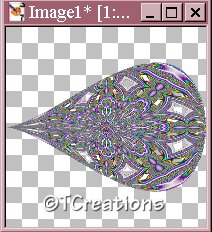
Step 5. Go to effects> geometric effects> circle one more time. Sharpen your image. Step 6. Go to effects> geometric effects> perspective horizontal and apply using these settings.
Sharpen your image by going to effects> sharpen> sharpen. Go to image> rotate and rotate to the right 90 degrees. Step 7. Go to image> resize and resize by 75%. Make sure resize all layers is UNCHECKED. Sharpen your image and with your mover tool, move to the top of your image to make room for the base. Lest's move on to page 2 to finish our globe.
|