|
|
|
|
Heart Shaped Mouse
This tutorial was created January 2nd, 2002 ©TCreations 2002 Property of TCreations This is my own creation. Anything similar is purely coincidental. Please do not place any part of this tutorial or it's contents any other place without my express written permission. This tutorial is written in PSP version 7.04 and assumes you have a working knowledge of PSP at a intermediate level.
I was inspired do create this tutorial after looking through a magazine and finding some cute children's valentines. It is similar to my Heart Shaped Elephant tutorial, except I do use vectors in a couple places. Don't worry, it is very easy! *grin* Lets get started! Tools needed for this tutorial:
JASC's PSP (30
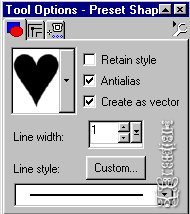
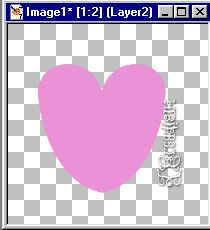
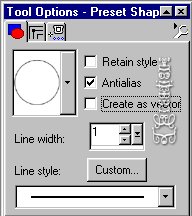
day free trial version) you can get here Step 1. Open a new image 400x400, transparent. Set your foreground and background to #EB91D5 Or whatever color you want your mouse. Step 2. Select your preset shapes tool with these settings.
Step 3. Draw your heart on your canvas. Step 4. Select the object selector tool, then right click on node edit. On the very bottom node, move the ends of the arrow down and out to shape the back end of the mouse. When you are satisfied, go to Layers> Convert to raster layer.
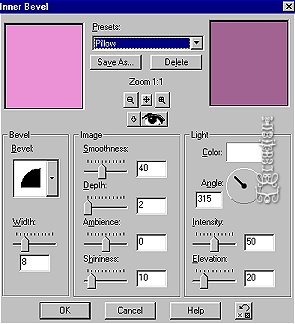
Step 5. Go to Image> Flip. With your mover tool, move toward the top of your image, leaving room for the tail. Step 6. Selection> All> Selection> Float. Go to Effects> 3-D Effects> Inner Bevel and using the "Pillow" preset, apply the inner bevel. Deselect.
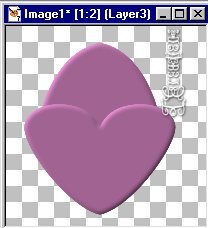
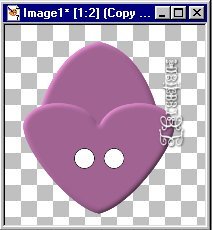
Step 7. Select your preset shapes tool again using the same settings as before. Change your foreground and background to a slightly darker color #FF00FF. Draw another heart on your canvas. Step 8. Select your Object Selector tool, then right click and choose Node Edit. Use the same technique as before. Click on bottom node and move the arrow down and out to make a more rounded look. Move into place.
Step 9. Go to Layer> Convert to Raster Layer. Go to Effects> 3-D Effects and apply the same inner bevel as before.
Step 10. Go to Layer> New Raster Layer. Name it "Eye". Change your foreground to black and your background to white. Step 11. Select your preset shapes tool with these settings.
Step 12. Hold down the Shift button as you are drawing the eye to keep it's rounded shape. Make one eye on the left side of your mouse. Step 13. Open your layer pallet and duplicate your eye layer. Step 14. Go to Image> Mirror. If you want to move your eyes closer together, grab your mover tool and move into place.
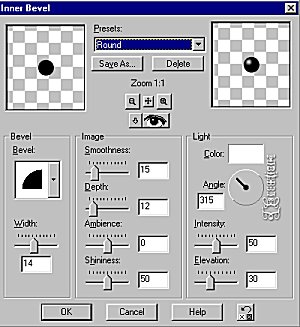
Step 15. Go to Layer> New Raster Layer. Name this layer "Inside eye" Step 16. Select your preset shapes tool and make your foreground and background black. Draw a circle inside the left eye. Go to Effects> Inner Bevel and use these settings.
Step 17. Go to Effects> Sharpen> Sharpen. Step 18. Open your layer pallet and duplicate the inside eye. Go to Image> Mirror. (If you moved your eyes before, you'll have to move your inside eye to match the other.) Let's move on to the next page to finish off our mouse. |